Working with brass opens up a world of creativity and craftsmanship, blending durability with a warm, golden hue that’s perfect for both decorative and functional pieces.

Whether you’re a beginner eager to try your hand at metalwork or a hobbyist looking to refine your skills, understanding the basics of brass crafting is essential.
From selecting the right tools to mastering simple techniques, getting started can be both exciting and rewarding. Over time, you’ll discover how versatile and forgiving brass can be, making it ideal for personalized projects or gifts.
Let’s dive deeper and explore the fundamentals of brass crafting together so you can create something truly special!
Choosing the Right Tools for Brass Crafting
Essential Tools Every Beginner Should Own
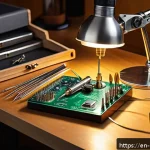
When I first started working with brass, I quickly realized how important it was to have the right tools on hand. Basic items like a quality jeweler’s saw, needle files, and a sturdy bench block made a world of difference.
The jeweler’s saw allows you to make precise cuts, which is crucial because brass can be unforgiving if you slip. Needle files help smooth edges and refine shapes, while the bench block provides a solid surface for hammering and shaping.
Investing in these essentials early on saves you frustration and improves your craftsmanship significantly.
Choosing the Best Soldering Equipment
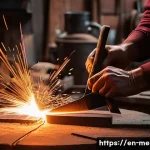
Soldering is where brass crafting really comes to life, but it can be intimidating if you don’t have the right gear. I found that a butane torch with adjustable flame control works wonders for small to medium-sized projects.
It’s portable, easy to handle, and heats brass evenly. Don’t forget quality solder and flux; these help create strong, clean joints. Beginners often overlook the importance of heat control, but mastering this will reduce the risk of damaging your workpiece and make your joints look professional.
Additional Tools to Expand Your Capabilities
Once you feel comfortable with the basics, adding tools like a rotary tool with polishing attachments or a hydraulic press can take your projects to the next level.
The rotary tool is fantastic for intricate polishing and engraving, offering a level of detail that hand tools can’t match. A hydraulic press, on the other hand, is perfect for bending and shaping thicker brass sheets.
These tools might seem like a splurge at first, but they open up so many creative possibilities that I found them well worth the investment.
Understanding Brass Properties and Their Impact on Crafting
Why Brass Is a Favorite Among Metalworkers
Brass stands out due to its warm golden color and excellent workability. From my experience, it strikes the perfect balance between softness and strength, making it easier to shape than steel but more durable than pure copper.
Its corrosion resistance is another huge plus, especially for decorative items that need to maintain their shine over time. This versatility means you can craft anything from delicate jewelry to robust hardware components without constantly worrying about material failure.
How Alloy Composition Influences Your Work
Not all brass is created equal. The specific mix of copper and zinc affects hardness, color, and malleability. For example, a higher copper content yields a reddish tint and softer metal, ideal for detailed engraving or shaping.
In contrast, more zinc results in a paler yellow and a tougher material that holds its shape well but requires more effort to bend or cut. Knowing this helped me choose the right brass type for each project, ensuring better results and less wasted material.
Working Temperature and Heat Sensitivity
Brass behaves differently under heat, which is critical during soldering or annealing. I’ve learned that overheating can cause it to become brittle or warp, so controlling the temperature is key.
Annealing brass by gently heating it then letting it cool slowly softens the metal, making it easier to work with. This process saved me hours of struggling with stubborn pieces and improved the final finish by reducing cracks or stress marks.
Mastering Basic Techniques for Brass Crafting
Cutting and Shaping Brass Safely and Effectively
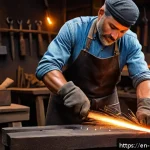
Cutting brass cleanly is the foundation of a good project. I started with a jeweler’s saw and gradually learned the importance of steady hands and slow, deliberate movements.
Using clamps to secure the brass and working in a well-lit area also helped minimize mistakes. For shaping, hammering on a bench block or using a mallet gave me control over curves and bends.
Patience here pays off because brass can be unforgiving if you try to rush or force it.
Soldering Tips for Strong, Neat Joints
Soldering can be tricky, but with practice, it became my favorite step. A tip I picked up is to clean the surfaces thoroughly before applying flux and solder; even tiny bits of grease or oxidation can ruin the bond.
Heating the brass evenly and watching for the solder to flow naturally ensures a strong, invisible joint. Afterward, filing and polishing the joint area blends it seamlessly into the rest of the piece, giving it a professional look.
Polishing and Finishing for a Stunning Look
The right finish transforms a rough brass piece into a gleaming work of art. I usually start with coarse sandpaper to remove any scratches or tool marks, then progressively move to finer grits.
Polishing compounds and a buffing wheel bring out that signature brass shine. For protection, I apply a thin layer of clear lacquer or wax to prevent tarnish.
This finishing touch not only preserves the beauty but also makes the piece easier to clean in the future.
Common Mistakes and How to Avoid Them
Overheating and Warping Brass
One of the earliest mistakes I made was overheating brass during soldering, which caused warping and weakened the metal. Brass is sensitive to heat, so it’s crucial to apply heat gradually and evenly.
Using a heat sink or moving the flame continuously helps avoid hot spots. If you notice any discoloration or distortion, it’s better to stop and let the piece cool before proceeding.
Taking these precautions will save you from costly rework.
Ignoring Proper Cleaning Before Soldering
Skipping the cleaning step before soldering is a common pitfall that leads to weak joints or messy finishes. I learned the hard way that even fingerprints can interfere with solder flow.
Always wipe your brass pieces with a degreaser or rubbing alcohol, and gently file any oxidation or residue. This ensures the flux adheres properly and the solder bonds securely, resulting in cleaner and stronger connections.
Using Incorrect Tools or Materials
Using the wrong solder or tools can cause frustration and poor results. For example, silver solder requires a different technique and higher temperature than standard brass solder.
When I first experimented, mixing these up led to melted parts and wasted materials. Always check that your solder matches the project and that your tools are designed for brass.
This attention to detail reduces errors and improves your confidence as you work.
Creative Project Ideas to Practice Your Skills
Simple Brass Jewelry Pieces
Starting with jewelry like rings, pendants, or earrings is a fantastic way to practice cutting, shaping, and soldering. I found small projects less intimidating and easier to complete, which kept me motivated.
Plus, brass jewelry has a timeless appeal and can be customized with engraving or patinas. These projects are perfect for gifts or even selling if you want to explore monetizing your craft.
Decorative Home Accents

Brass’s warm glow complements home decor beautifully. I’ve made candle holders, picture frames, and small sculptures that add a personal touch to my living space.
These projects often involve combining brass with other materials like wood or glass, which expands your skill set. Plus, they allow for more experimentation with texture and finish, making your creations stand out.
Functional Items with a Personal Touch
Functional brass items like keychains, drawer pulls, or desk organizers are practical yet artistic. Making these gave me a sense of accomplishment because they’re useful every day.
You can personalize them with initials, patterns, or unique shapes to add meaning. The durability of brass means your handcrafted items will last and become cherished keepsakes.
Brass Types and Their Best Uses
Common Brass Alloys and Their Characteristics
Different brass alloys offer unique features that affect how you work with them. For instance, cartridge brass (70% copper, 30% zinc) is highly ductile and great for bending and forming.
Admiralty brass includes a small amount of tin, which improves corrosion resistance—ideal for outdoor projects. Knowing these traits helps in selecting the right brass for your specific needs.
Color Variations and Aesthetic Choices
Brass color ranges from reddish to bright yellow depending on the alloy. I personally enjoy mixing alloys in a single piece to create contrast and visual interest.
Some artisans even age or patina brass intentionally to achieve antique or rustic effects. Understanding these color dynamics allows you to tailor your project’s look and feel perfectly.
Where to Source Quality Brass Materials
Finding good brass stock can be challenging but is key to successful crafting. Local metal supply stores often carry sheets, rods, and tubes in various sizes.
Online suppliers offer a wider range and sometimes better pricing, but shipping costs should be considered. I recommend buying small quantities initially to test before committing to larger orders, especially when experimenting with new alloys or thicknesses.
| Brass Alloy | Copper Content | Zinc Content | Characteristics | Best Uses |
|---|---|---|---|---|
| Cartridge Brass | 70% | 30% | Highly ductile, easy to form | Jewelry, intricate shapes |
| Admiralty Brass | 70% | 29% | Corrosion resistant due to tin | Outdoor hardware, marine applications |
| Alpha Brass | 60-70% | 30-40% | Harder, less ductile | Structural components, tools |
| Red Brass | 85% | 15% | Reddish tint, softer | Decorative pieces, engraving |
Maintaining and Caring for Brass Creations
Preventing Tarnish and Corrosion
Brass naturally tarnishes over time, which can dull its shine. From my experience, regular cleaning with a mixture of lemon juice and baking soda or a commercial brass cleaner keeps pieces bright.
Applying a protective wax or lacquer after polishing extends the life of your work by creating a barrier against moisture and air.
Proper Storage to Avoid Damage
Storing brass pieces properly prevents scratches and oxidation. I store my smaller items in soft cloth pouches or lined boxes and keep larger works covered and in a dry environment.
Avoid stacking brass directly on other metals to prevent scratches or galvanic corrosion. Taking these simple steps means your pieces will look great for years.
Refinishing Older Brass Items
If your brass item gets tarnished or scratched, refinishing can restore its beauty. I gently sand the surface with fine-grit sandpaper, polish it thoroughly, and apply a new protective coating.
This process can breathe new life into heirlooms or older projects, making them look as good as new while preserving their character.
Safety Tips for Working with Brass
Protecting Yourself During Cutting and Soldering
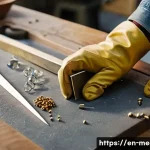
Safety should never be overlooked. Always wear safety goggles and gloves to protect against sharp edges and hot materials. Working in a well-ventilated area is essential, especially when soldering, to avoid inhaling fumes.
I also keep a fire extinguisher nearby just in case things get out of hand.
Proper Handling of Chemicals and Flux
Flux and cleaning chemicals can be irritating to skin and eyes. I use disposable gloves and work with these substances on a covered surface to avoid spills.
After handling, washing hands thoroughly is a must. Reading safety instructions on product labels is something I never skip.
Safe Disposal of Brass Scrap and Waste
Don’t toss brass scraps in the trash. Many recycling centers accept brass, and recycling helps reduce environmental impact. I keep a small container for scrap pieces and take them to a metal recycling facility periodically.
This habit not only helps the planet but can sometimes earn a little cash back.
Wrapping Up
Choosing the right tools and understanding brass properties are essential steps for any crafter looking to excel in brass work. With patience and practice, mastering basic techniques can lead to impressive, professional-quality projects. Remember, investing time in safety and proper maintenance will ensure your creations last and shine. Embrace the learning process, and let your creativity flourish through this versatile metal.
Useful Tips to Keep in Mind
1. Always start with high-quality, essential tools to avoid frustration and improve your craftsmanship from the beginning.
2. Pay close attention to heat control during soldering to prevent warping and ensure strong joints.
3. Clean your brass thoroughly before soldering to achieve neat, durable connections.
4. Experiment with different brass alloys to find the best match for your project’s needs and aesthetic goals.
5. Store and care for your brass pieces properly to maintain their shine and extend their lifespan.
Key Takeaways
Understanding the material characteristics of brass and selecting the appropriate tools are the foundation of successful brass crafting. Heat management and surface preparation directly impact the quality of your soldering and finishing work. Avoiding common mistakes like overheating and neglecting cleaning will save time and material. Finally, consistent maintenance and safety practices protect both your creations and your well-being, making the entire crafting experience more rewarding and sustainable.
Frequently Asked Questions (FAQ) 📖
Q: What basic tools do I need to start working with brass?
A: When you’re just starting out with brass crafting, having the right tools can make a huge difference. At minimum, you’ll want a good set of metal snips or shears for cutting, a small hammer and mallet for shaping, and files or sandpaper to smooth edges.
If you plan to do soldering or joining, a basic soldering kit designed for metalwork is essential. I found that investing in a sturdy workbench or a vise helps keep your pieces steady, which is a game changer for precision and safety.
Starting simple and gradually adding specialized tools as you grow more confident is the best approach.
Q: Is brass a good material for beginners, and why?
A: Absolutely, brass is one of the most beginner-friendly metals out there. It’s softer and more malleable than many other metals like steel, so it’s easier to cut, shape, and bend without requiring heavy machinery.
Plus, brass has a naturally beautiful golden color that doesn’t require additional finishing to look great, which means you can see quick results even as a novice.
From my own experience, brass’s forgiving nature allowed me to experiment without fear of ruining the material, which kept the learning process enjoyable and encouraging.
Q: How can I prevent brass from tarnishing and keep my projects looking fresh?
A: Brass does tend to tarnish over time due to exposure to air and moisture, but there are several ways to keep it shining. Regularly wiping your pieces with a soft cloth to remove fingerprints and dirt helps a lot.
For longer protection, applying a clear lacquer or wax coating can seal the surface and slow down oxidation. I personally use a homemade mix of lemon juice and baking soda for quick cleaning—it works wonders for restoring shine without harsh chemicals.
Just remember, the key is consistent care, especially for items you handle often or display prominently.